- Dharma Fiber Reactive Procion type dye is the dye of choice for all cellulose fibers, like cotton, rayon, hemp, bamboo, Tencel, etc. They are even sometimes used for silk because they are so economical. This is the dye you've seen on tie-dyes on the street, at fairs, festivals and concerts - the colors are brilliant and permanent. They don't fade, even after repeated washings. Because they don't come off, they are even safe on infant clothing and clothing for chemically sensitive folks, once excess dye and chemicals are properly washed out. They are economical, and easy to use. Superior to supermarket dyes in every way!
How to page https://www.dharmatrading.com/html/eng/529106-AA.shtml
Let's get started!

step 1: fold and tie your garment
Ideally, first pre-wash garments in HOT water and Synthrapol or Prof. Textile Detergent to remove any oils, dirt or anything else that might resist the dye. Fold and/or tie the fabric into the desired patterns. For more defined patterns wet the shirt and squeeze or spin out excess water before folding. We have several books and DVDs with great pattern ideas!
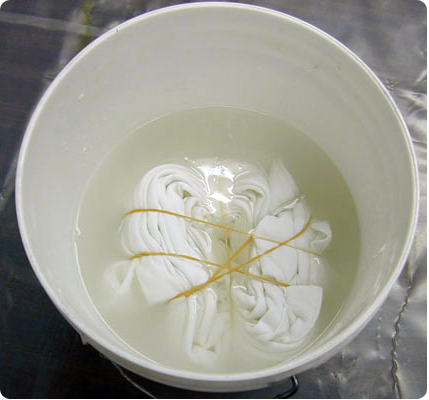
step 2: soak garments in soda ash solution

Wear your dust mask & gloves! Use - 1 cup (8 oz.) of Soda Ash Fixer per gallon of warm water. A gallon will soak 10-12 adult XL tees - so way more kids tees, fewer dresses, etc.
Soak the tied garments about 5-15 minutes. Squeeze out the garment so it is damp but not dripping. You can reuse solution until gone.
step 3: mix your dyes
Wear your dust mask & gloves! Measure urea and warm water into a container, an old pitcher works well. Use the chart below for amounts. Paste up your dye with the urea water (see below), then add rest of water and stir 'till thoroughly dissolved. Pour into squeeze bottles with a funnel. An already wet, tied up adult tee will absorb about 4 oz of liquid dye, depending on how much you apply. Use this as a guide to help you decide how much to mix up. Check the name of each color on the label of the jar, some colors need more dye, they are marked with an * or ** by the name.
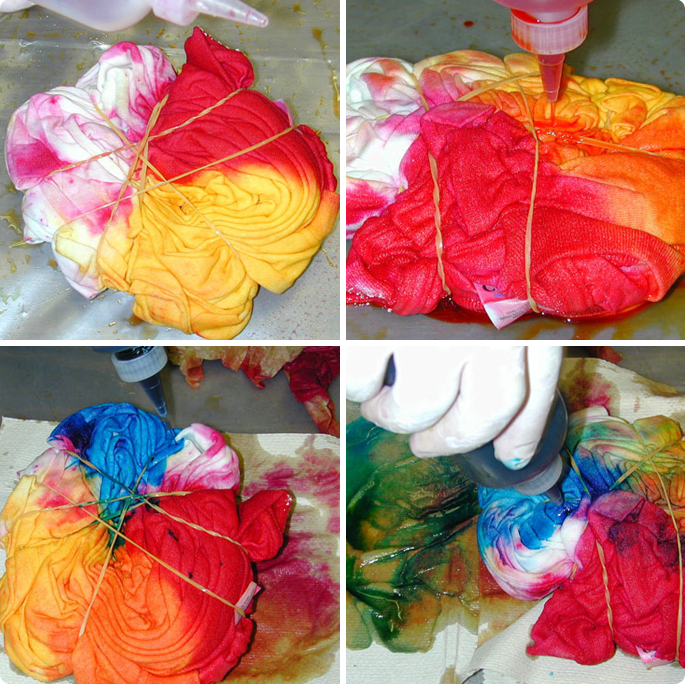
step 4: squirt on your dye
Apply dye with squeeze bottles, paint brushes, sponges, etc., as many colors as you want. (see below for tips).
step 5: let it rest
Put tied fabric in a plastic bag (you want to keep it damp). Let it cure for at least 4 hours but preferably 24 hours for the brightest colors. In temperatures below 70º F, it takes longer.
step 6: wash it out
Pre-fill your washing machine with hot water and 1/4 cup Synthrapol or Professional Textile Detergent. Rinse the tie-dyes thoroughly before putting in the machine. Leaving ties on, rinse under cold running water (faucet, hose or shower), to stop the dye reaction. Next rinse in warm water while you untie the folds, keep rinsing until water runs fairly clear. Throw in the machine as soon as it is rinsed, running it through a full cycle. Don't wash more than the equivalent of about 8 adult size t-shirts at a time or the water gets too muddy. You can use Milsoft professional fabric softener in the final rinse to make your tie-dyes super soft!.

- Any natural fiber is great for tie-dye: cotton, rayon, hemp, linen, ramie etc. If you can't find 100% natural shirts a 90% cotton and 10% polyester or lycra is ok, but avoid 50/50 blends (come out very pale).
- When tie-dyeing silk or wool or other protein fibers, keep in mind that Fiber Reactive colors shift on these fibers, and you cannot get a true black. Soda Ash is also very hard on these fabrics, so use half as much, and don't cure for more than 4-6 hours, or use the vinegar / microwave method instead of using Soda Ash.
- It is always good to pre-wash your fabric and garments; fabric softeners, oils, and other finishes can prevent the dye from absorbing into the fiber.
- Cover your work surfaces with old newspapers or folded paper towels to absorb extra dye. Elevating the garment off the table is good too; we like old cookie cooling racks for this. Be sure to wear old clothes because dye will stain!
- Make sure you get everything covered with dye. After applying dye to one side, flip garment over and repeat the process. Inject the tip of the squeeze bottle into the folds for best dye penetration and less white on the final product.
- Put a small amount of Sodium Alginate thickener or Super Clear liquid thickener into dye mixture (step 3) to slow down the rate that the dye spreads and to create sharper edges.
- Got a leaky Squirt bottle? A couple wraps of white Teflon plumber's tape around the threads solves this problem perfectly. It is cheap and available at any hardware store. No tie-dyer should be without it!
- In step 4 any method keeping the fabric wet is OK, needn't be a plastic bag - many cover with plastic drop cloth, wrap in plastic wrap, etc. The warmer the temperature where you lay out your tie-dyes to cure, the quicker the chemical reaction.
- Use Water Softener if you suspect you have "hard" water
- DON'T USE HOT WATER. The dyes work best in lukewarm water (105 degrees). #250- Jet Black does like hot water (140 degrees)and does NOT do well for tie-dye (unless you cure your tie-dyes under an electric blanket!).
- Urea helps dye to dissolve, so dissolve the Urea in the water first. Add this water to the dye powder gradually and paste it up to avoid lumps. Undissolved dye makes "explosions" of color or "freckles", so if a color is difficult to dissolve, straining through some light fabric might be necessary. Coffee filters only work if the dye is really liquid. Otherwise, they filter out too much of the dye
- If you have trouble making a paste of the colors, a little Calsolene Oil can help because it breaks the surface tension.
- With this dye, there is always lots of "excess dye" to be washed out. Don't crowd your washing machine with too much tie-dye or the water gets too muddy and so will your tie-dyes. A key to clear, brilliant tie-dyes is the rinse and washout procedure - don't skimp!
- Delicate items like rayon are better hand washed or should go into a mesh bag on a gentle cycle so the agitation doesn't shred them.
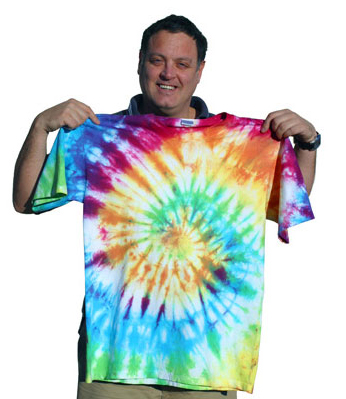
How to Make the Classic Spiral Tie-Dye T-shirt:
If you are looking to learn the basics of tie-dye folds and patterns, there really is no better way to do so than checking this video out.
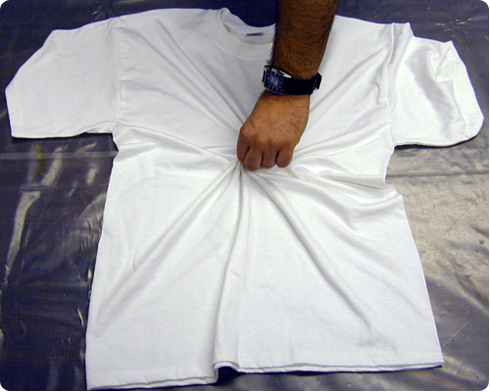
Step 1: Place a pre-washed, still damp (the fabric should not be dripping wet, but evenly damp as if it came directly out of the washing machine), t-shirt flat on a smoothed plastic drop cloth.
Step 2: Pick a spot on the shirt and pinch some fabric to place between your fingers. Some use a fork in place of your hands but that has been known to tear the fabric if you are not careful.
Step 3: Twist your fingers to begin the spiral twirl and begin wrapping the fabric around your pinch. Continue twisting until it resembles the shape of a cinnamon roll.
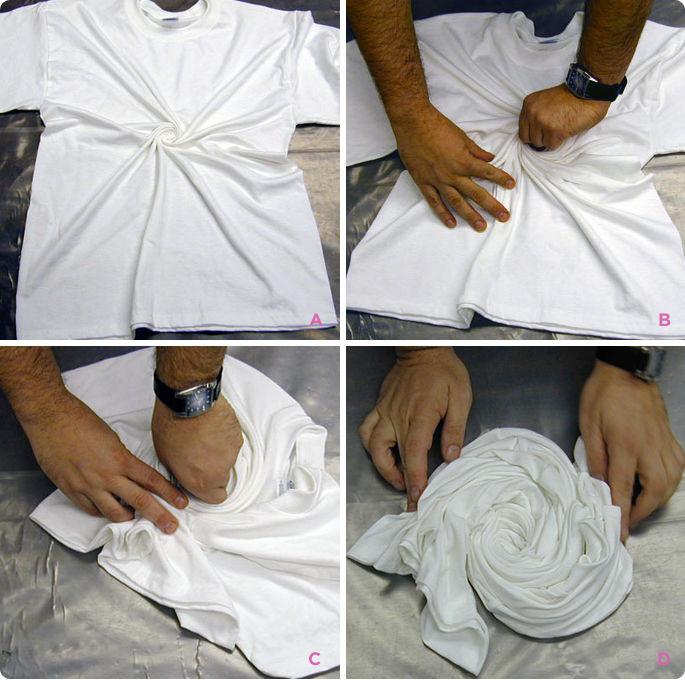
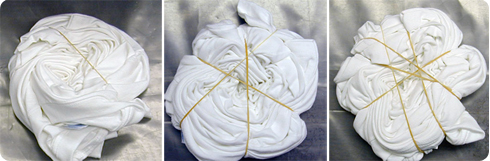
Step 4: Rubber bands (or tied string) is used to hold the fabric together. Slide the rubber bands under and over the spiral so that the fabric will hold its shape during the dyeing process.
Step 5: Wear your dust mask and dissolve 1 cup (8 oz.) of Soda Ash Fixer per gallon of warm water. Soak the tied garments about 5-15 minutes (until saturated). Reuse solution until gone. Squeeze out excess so garment is just damp, not dripping.
Step 6: Using your dust mask and gloves, combine water with all chemicals except dye. Add liquid to dye gradually, pasting up to avoid lumps. Apply the dye to your shirt using squeeze bottles, paint brushes, sponges, etc., as many colors as you want. Easiest to use a funnel to pour dissolved dye into squeeze bottles.
Step 7: Put fabric (still tied) in a plastic bag (the idea is to keep it wet and chemically active - any method of keeping it wet is O.K.) and let sit for at least 4 hours but preferably 24 hours to "cure". Shorter times work better in summer, and longer times are needed when it is cold.
Step 8: Remove from bag and while still tied, rinse off the excess dye under cold running water (faucet, hose or shower), then rinse in warmer water while you untie and after garments are untied, until water runs fairly clear. Have your washing machine pre-filled with hot water with Synthrapol and throw in the clothing as soon as it is rinsed, running it through a full cycle.